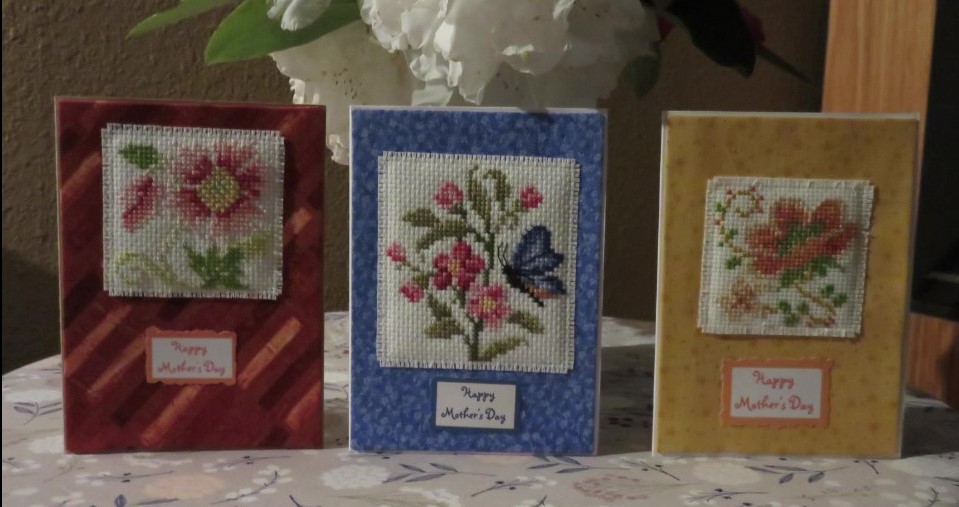
DahliaDoll wrote: ↑Wed Jun 12, 2019 2:00 am Mother's Day Cards:
Left to right:
Pink flower and bud free chart from Zweigart (for Leslie)
Butterfly Floral Coaster Insert free chart from janlynn.com (for Shirley)
Orange flower free chart from Zweigart (for Emelie)
Serinde wrote: ↑Sat Jun 15, 2019 8:55 amThese are wonderful finishes. Please don't tell me you make your own fabric-covered yardstick...! Ok, then how do you make fabric-covered card stock? A tutorial?DahliaDoll wrote: ↑Fri Jun 14, 2019 5:53 pmThank you Mabel and others!Mabel Figworthy wrote: ↑Thu Jun 13, 2019 4:15 pm Beautiful cards - how do you get that slightly padded look?
I use a piece of quilt batting behind the CCS motif and machine stitch it to fabric-covered cardstock. I use a monofilament thread so it is more-or-less invisible.
In response to this request, I am just jotting down my procedure. If anything is unclear, please let me know. It’s very much like what Vonna Pfeiffer does in her video tutorial for finishing a flatfold when she’s covering one of the backing pieces.
https://www.youtube.com/watch?v=7zOgDQlkKUk
1. Cut a piece of cardstock to the size you want it to be (I usually make it about 1/8” smaller than the actual card front I’m using).
2. Cut a piece of fabric 1” larger all around than the piece of cardstock.
3. Using a temporary basting spray (like 505), spray one side of the cardstock.
4. Center the cardstock onto the wrong side of the fabric. Press it down firmly and be sure there are no wrinkles on the front side.
5. Using glue stick, wrap and glue the fabric around the cardstock, taking care to make the corners as square as possible. (see Vonna’s video although she doesn't use glue stick).
6. Cut your cross stitched motif to desired size, leaving enough fabric to create a fringed edge by removing as many rows of woven threads from the fabric as you'd like. I usually cut Aida 3 rows away from the edge of the motif and fringe one row.
7. Cut a piece of quilt batting slightly smaller than the cross stitched piece.
8. Using the temporary basting spray, spray one side of the batting and center it on the wrong side of your cross stitched piece, then spray the back of this piece.
9. Place the cross stitch in place on the fabric covered cardstock. The basting spray will hold it in place pretty well.
10. Machine stitch around your cross stitch close to the edge. This can be done in a matching thread or contrasting thread. I usually use a monofilament (invisible) thread. It's a good idea to keep a sewing machine needle especially for sewing on cardstock, so it doesn't dull your regular needle. (Do as I say, not as I do. LOL)
11. Glue your covered cardstock with cross stitch motif to the front of your greeting card. I usually use ModPodge for this step.
12. If you used a wet glue (like ModPodge) place the greeting card under a heavy book so that it will dry flat.

